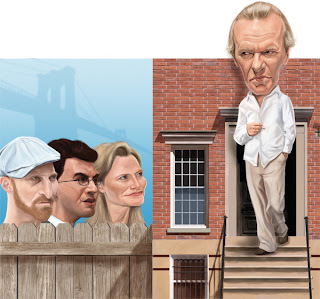
I have a confession to make: I've only been digital painting for a couple of years now, and for many more years before then I did all my illustration work in vector programs like Adobe Illustrator and Flash. So even though I love digital painting with Photoshop, I still find opportunities to speed up my workflow by returning to my old vectory ways. Such was the case when I was hired to do my second cover for The New York Observer. It's a real honor getting to work for the Observer, considering the amazing array of talented illustrators that have done covers for them, and Design Director Ivy Simones is awesome to work with. But being a weekly newspaper, the deadlines are extremely tight so in order to meet my deadline I have to use every trick I know in order to produce good work in the most efficient and timely manner possible. In this particular instance, by the time I received the okay to paint my original sketch, I had a little bit over one day to do the final illustration. I used to work a few years ago as an art director for a monthly magazine so I know how important it is for me as an illustrator to do everything in my power to make the AD's life easier on deadline day. The editors were pretty specific in their request for not only doing a caricature of author Martin Amis and three other New York scribblers, but also they wanted a typical NY brownstone apartment building, a fence and even the Brooklyn Bridge in the final image. Whenever I have complex objects like buildings to illustrate, I find it's easier for me to first build the underlying structure of the object in vectors, then paint over those shapes. I used Adobe Illustrator to build the foundation of my background objects, but Photoshop's pen and shape tools can be used pretty much the same way as Illustrator.
I started building the fence first. I used the pen tool to draw a simple shape for the one of the slats.

Next, I wanted to give the object a little dimension, so I selected Copy (Command + C, or Control + C on a PC), then Paste in Back (Command + B). With the background object still selected I used the arrow keys to nudge it over to the right a little bit until it looked like this:
There I had my first fence slat. I copied the object several times. In Illustrator you can do this quickly by selecting the object, then by holding down the Option and Shift keys while dragging the object to the right to create an exact duplicate of the fence. I did this several times, then added a long skinny rectangular cross-beam on top until the finished piece looked like this:
I continued this process of creating simple shapes and setting them each up on individual layers until I ultimately had the barebones version of my background.
Then, piece by piece, I selected the individual elements from my vector background and pasted them into my Photoshop document as Smart Objects (you won't need to do this step if you build your pieces in Photoshop to begin with).
I went back to work on my fence again. I used the Magic Wand tool in Photoshop to select the top and bottom section of my first fence slat like so:
Then, because I knew time was short, I chose to add a real wood texture from a photograph. I dug up a cheap stock photo of some wood planks. Then used the Marquee Tool to select one of the planks. I selected Copy (Command + C), then returning to the selection I made in my vector object I chose the Paste Into command (Command + Shift + V). This actually auto-generates an editable mask around the texture and placing it on a new layer that fits perfectly.
And it looks like this:
I repeated this process for each of the wood slats until I had the entire fence built. After that, I went back in and reduced the transparency on each of my wood texture shapes. Then I used some custom brushes I've put together over the years, and painted over the wood textures so that they blended into the rest of the illustration. Lastly, I painted some shadows I on a Multiply layer. The complete fence looked like this:
I did much the same thing by pasting in some brick textures into the main structure of the brownstone. This saved me a ton of time I would have otherwise had to spend paintstakingly rendering each individual brick. If I'd had more time I probably would have done just that, but time was at a premium and even by taking these shortcuts, I still ended up finishing the illustration with literally minutes to spare before my deadline. Ivy was happy, which of course made me a happy boy as well.


3 comments:
Nice insight.
Thank for this lesson very very good Mark
Excellent Mark - I have illustrator and must brave it again soon to try this out. Cheers !
Post a Comment