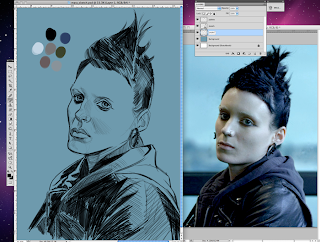
I've had more the one person ask me recently to describe my process when I paint, so here are some of the steps I put into my painting of Rooney Mara from The Girl With the Dragon Tattoo.
I started with a sketch, based on the reference you can see here. I did this sketch in Autodesk Sketchbook Pro, but I've gone ahead and drawn straight in Photoshop as well plenty of times. BTW, I'm using Photoshop CS4. I work large, so I set my canvas size to 3000 pixels wide by 3700 pixels tall at 300 dpi. With the sketch on its own layer, I set that layer to multiply, then added another layer below that which I flooded with color. I very rarely paint over a pure white background. It makes it a lot easier to create a uniform tone throughout the painting, plus staring at all that harsh white would be murder on my eyes after a while. You'll also notice I created one more layer above all the others where I've started creating my palette. I'll add to the palette as I go along, but for now what you see here will be my base colors.
As for my brushes, I've collected a pretty large library of brushes from various sources, along with some I've created on my own, but the two main brushes I used here are a simple hard round brush with the settings you see above, and one of the standard Photoshop rough-edged brushes that I've clicked on the same settings as the hard round.
Now, I add another layer below the sketch layer, but above the background color layer. On this layer I block in my base colors with the hard round brush. I always paint with the brush opacity set to 90% and the flow to 100%. Don't worry about being too neat here, you've got a long way to go and you'll be covering most of this up as you go along.
Once you have your base colors and lighting established below the sketch layer, then you're ready to move onto the heavy duty painting. I create one more layer above the sketch layer (I label mine "Paint", but call it whatever you want). I stay zoomed out so that I can see the entire portrait while I paint. The work will go a lot faster and you won't get tied up focusing on tiny details that will get lost anyway by working this way. I've started working now switching between the hard round and the rough edged brush. The rough edged brush gives a more a painterly look. I like to see the brush strokes in my paintings. I work dark to light, or in other words, I paint in my darkest darks first, working my way through the midtones and eventually to the brightest highlights. The overall tone of the reference is pretty dark, so you'll notice I haven't used any white at all up til now. Only after I'm satisfied with how things are going, do I start to zoom in and tighten up details such as the eyes and mouth.
I drew a Chinese dragon on paper with my favorite brush pen, the Pentel Pocket Brush, and scanned it in. I copied and pasted this drawing onto a new channel in my painting.
I used that channel to create a selection on a new layer behind my main painting. I filled that selection with white, then I used the motion blur filter to give it a sense of movement. I've also dragged in a couple more scans of some actual paint splashes and played around with the layer styles and opacity until I came up with a somewhat natural looking mix. I've also started roughing in some some additional texture to the background with a couple of custom texture brushes I have in my collection. The last detail is to draw in a rough white outline around the figure to help tie the foreground into the background line art.


No comments:
Post a Comment